Showing posts with label terra maledicta. Show all posts

Wednesday, 2 March 2022

Terra Maledicta "Antenna / Free Ray Gun / Death Machine / Corrupted Heart" Easter Eggs - Call of Duty Vanguard Zombies


Map Layouts: Temple / Main Spawn -- East Spring / Tents / Fuel Depot / Radio Post / Merchant Road East / Outpost Courtyard -- West Spring / Arroyo / Bazaar / Merchant Road West / Train Wreck / Rail Road / Derailment / Market Storage -- Merchant Road / Debris Field /The Spike /Storehouse --

Easter Egg Guide: -- Part 1 -- Part 2 --

Secrets: -- Free Ray Gun / Death Machine / Antenna / Corrupted Heart --


Hey guys,

here how to get a FREE RAY GUN / DEATH MACHINE / ANTENNA / CORRUPTED HEART within the Call Of Duty Vanguard Zombies map Terra Maledicta. 

As we all know, nothing in life comes for free, however, sometimes it does surprise us and throws us a little gift or two here and there.....which is always welcome.....however in this case....get ready for some back breaking work digging around the scorching hot desert with a rusty shovel. 

Probably not how you envisaged spending your day off work, sweating buckets and possibly pulling a muscle or slipping a disc in your back, however if I says at the end you would be rewarded with some off world, inter dimensional , off world weaponry....I think I could change your mind quite easily.

Lets see how we get these freebies in Terra Maledicta so we can start tearing the place up with some awesome, cataclysmic firepower.


Can ya dig it man?

First up, we need to find one of the SHOVELS that appear within Terra Maledicta, in some of the many locations it can spawn. 

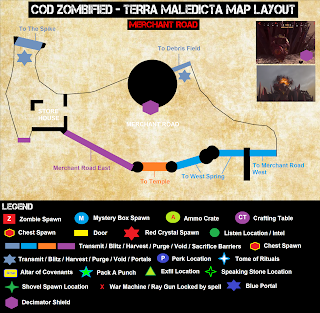
Some spawn locations are mentioned on the maps below:

  • East Spring Area - Near the Outpost Courtyard
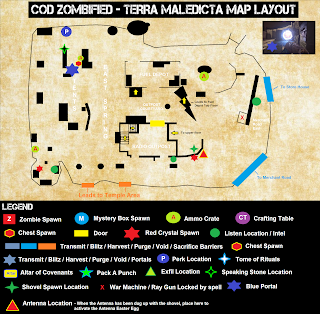


  • West Spring Area - In the Market Storage area

  • Derailment Area - Against the train carriage


  • Debris Field - to the far right of the Venomous Vigour Perk Fountain


Now that we have the SHOVEL, we can get to work!

What we now need to do is search every area of the map, digging up every dig site you can find in each of the areas, until you find the ANTENNA

The next steps of all these side secrets are basically this premise and on your digging travels, you will be gathering free weapons from the dig sites, salvage etc so its not all in vain.

Also, while digging up the ground without planning permission, we will be coming across 4 pages we need to find from the BOOK OF TOMES, in order to free up the DEATH MACHINE that is blocked in the room held behind a spell, with a RED X on it. If we find in our digging travels, a RAY GUN that appears and when we reach out to it, it zooms off into the distance, this room will also contain the RAY GUN as a nice double whammy of a reward for opening this sacredly sealed room, as the RAY GUN zooms to this rooms location, faster than warp speed.


This Antenna isn't picking up my favourite TV channel

Once you eventually find the ANTENNA from the dig sites, simply go over to the collection of RADIOS near where the ARMOURED VEHICLE is in the MERCHANT ROAD area. They are basically outside the RADIO OUTPOST building and PLACE THE ANTENNA on these radios.


Now you should be getting all of your favourite TV channels and DAB radio stations....if not...make sure you kept the receipt and return it to the store you purchased it from.


Once the ANTENNA has been placed down, a load of BOOM-SCHREIER's will spawn and try to blow a hole in the planet, there is just so many of the critters!! 


Once you defeat this Boom-Schrieier wave, simply head over to the DEBRIS FIELD area and to the right of the blue VENOMOUS VIGOUR FOUTAIN, where you will find another ANTENNA that needs realigned. Simply hold the use button on it and the ANTENNA will move about 90 degrees to get the best reception.

This of course......yip you guessed it......will spawn another large wave of BOOM-SCHREIER's. Simply defeat this wave as easy as 1, 2, 3.....then we can move onto the BAZAR's upper floor, where we will find another ANTENNA that needs rotated and aligned.


Again, in the BAZAR, hold the use button on the radio antenna and it will move, spawning.....I am afraid to say it again.....I sound like a broken record.....another wave of BOOM-SCHREIER's

Simply take out this slightly harder wave and we can move onto the next step.

Now we can head over to the Market Storage building, located just across from the BAZAR, not to do some shopping, more to realign the last RADIO ANTENNA


When we realign this antenna....yip you guessed what I am going to say next don't you?.....its spawns in loads of BOOM-SCHREIER ZOMB......ah ha....that's not what it does, this time around it will spawn in a wave of the tougher, bigger, badder, meaner....and possibly uglier, STURMKRIEGER ZOMBIES!


Simply wipe them off the face of the planet, and you will then be given you reward.....which is a nice.....drum roll please......chest......with a few purple tier weapons and a death machine most times. Not the greatest reward for all that hard work, but nothing in life comes easy as they say. 

This chest will spawn just outside the MARKET STORE front door which faces the BAZAR, behind the armoured vehicle impaled with red crystals, enjoy!


Ray is gunning for it

Among our digging antics, we may also come across a RAY GUN emerging from the sand. When you reach out to touch it, it will dash away off into the distance, after sitting and waiting on it returning for several days I came to the conclusion....its not coming back.


Armed with this knowledge, if you now to go the EAST SPRING area then over to the MERCHANT ROAD WEST section, you will see the room with the RED X style barrier protecting it. Have a sneak peek inside and where the death machine is sitting, you will now see the ray gun also waving back at you.....not literally....ray guns don't have arms.....wait a minute.....nor do ray guns exist....hmmm interesting.


Also when the RAY GUN has been dug up, it will spawn in a large amount of BOOM-SCHREIER zombies which you will also have to deal with.


Anyway, simply keep digging around all dig sites you can find until you find the ray gun pop up and zoom off. Then we need to keep digging, until we start to find TOME PAGES. There is 4 in total and it will take a bit of time for these to appear around the map, so keep digging until the shovel is ready to break in half. 

You may come across the pages before finding the ray gun, but continue digging until you find it as well before opening the sealed room, just to make sure it doesn't glitch.

So, once the:

  • Ray gun has been dug up and zoomed off into the distance
  • Found all 4 pages from BOOK OF TOME

We can now head over to the sealed room, where we need to put the 4 pages from the BOOK OF TOMES onto the magic seal over the door in order to release it.


Pages need to be put down in a specific order. You can put pages on the top, right hand side, left hand side and bottom of the door. It can be a bit glitchy sometimes and fiddly, but keep hitting the use button and moving back and forward or side to side when placing down to hit the sweet spot for that particular side or area.

If you put the pages down in the wrong order, they will all disappear. For example, if you put the first page down on the top, then the second on the right and then the third page on the bottom......then they all disappear....it means the first page and second page are correct, but the third page was in the wrong position. Just keep trying them until all 4 can be placed down, without them disappearing and your set!


The seal will release itself and you should be able to pick up both the DEATH MACHINE and the RAY GUN, or just the DEATH MACHINE if didn't find the RAY GUN or were not bothered about it.


Corrupted heart.....not the same as corrupted hard drive

In order to find a special type of heart called a CORRUPTED HEART within this map, we need to dig like crazy until it pops up. When you find it, it will be glowing blue/purple and when you pick it up, it will zoom towards you, when it hits you, you will have a red glowing around your body for a while.


Now what you can do is go around the map, now that your heart is corrupted, finding the RUNES that have appeared in red around the map. You can then bury the CORRUPTED HEART at these locations and when you do, you will be given an extra SACRIFICIAL HEART.


You can run around the map buying the CORRUPTED HEART at these spots then picking it back up again by digging out of the spot you just buried it in. The more you do, the more RUNES you bury it in and pickup, the more stronger the RED AURA /GLOW around you becomes.

We are not sure there is much more to it at present for the CORRUPTED HEART, it could be part of the next step in the story for zombies or there is something still to be found in Terra Maledicta to do with this heart.

NOTE: When carrying around the CORRUPTED HEART, you will have half your normal health, which can catch some people out, thinking they can take more hits than they think at times.


Still not sure how to do the above steps? Then check out MrDalekJd's Youtube video:


Thanks for reading as always guys.

Henry


Sunday, 27 February 2022

Terra Maledicta Easter Egg Guide Part 1- Call of Duty Vanguard Zombies


Map Layouts: Temple / Main Spawn -- East Spring / Tents / Fuel Depot / Radio Post / Merchant Road East / Outpost Courtyard -- West Spring / Arroyo / Bazaar / Merchant Road West / Train Wreck / Rail Road / Derailment / Market Storage -- Merchant Road / Debris Field /The Spike /Storehouse --

Easter Egg Guide: -- Part 1 -- Part 2 --

Secrets: -- Free Ray Gun / Death Machine / Antenna / Corrupted Heart --


Hey guys,

here is the Main Easter Egg Guide for the Call Of Duty Vanguard Zombies map Terra Maledicta. 

This is actually a very easy Easter Egg to complete and is not really an Easter Egg as such as we know it, when compared the other zombies maps and games before this one. You simply play through it and go through the path it sets out for you and if you keep going, you will eventually come to the end...it's like your on a linear path that you cannot really deviate from, which sort of sucks a little bit of the fun out of zombies this time around.

Previously you could decide with each play through to go do this first, then get this later and so on....now its just do this....then this....then this...and that's the game over....much more quicker than you will expect in Terra Maledicta.

To complete this map, it doesn't even really require you to have the most upgraded weapons and perks activated in your play through as, like I say, its that easy. I think I completed it on my 5th play through and unfortunately after finding everything on the map and doing it once, has not really made me want to go back and play it again unfortunately.....which is not what you want in a zombie map..... a zombie map should keep you coming back for more and trying to reach the highest round you can, obtaining a new personal best.

However as most people agree and have said online and through social media etc, unfortunately this zombies map does not offer a lot of longevity once you complete it....I doubt you will want to keep doing it again and again as it will drive you nuts.

However lets get down to the nitty gritty and see how we can complete this map, we still have a job to do soldier....and that's kick some zombie ass....no matter what.


Open Sesame

When we initially spawn into the map, the best thing to do is start to open up the map as much as we can. We do this by completing portals, which with each playthrough, will have a different objective assigned to them to complete. 


The main spawn area is the TEMPLE area and it contains 3 portals that when opened will gain you access to the MERCHANT ROAD, EAST SPRING and WEST SPRING areas once the portals objective has been completed.


If you firstly complete the portal objective that leads to the MERCHANT ROAD area and when you come back to the TEMPLE after completion, enter the newly unlocked area for MERCHANT ROAD and you will see the DECIMATOR SHIELD shield floating up in the air in the centre of the road.....its a sight to behold.


This starts speech coming from INVIKTOR where he is surprised to see the shield when you walk up to it, as he thought it was lost in the Dark Aether. Obviously he was wrong about it being lost in the Dark Aether and I want him to know, that I know, that he knows....he was wrong about it being lost. I just like pointing out mistakes to people....its annoying I know.


Now that we have heard this intriguing dialogue about the DECIMATOR SHIELD, head over to the TEMPLE and complete the PORTAL OBJECTIVE that leads to the EAST SPRING area. When you come back from the little holiday in the portal where you didn't send me that postcard you promised, you need to head over to the TENTS area and go up to the green perk fountain, which is the DEMONIC FRENZY perk. 


Once here, turn around 180 degrees and you will see a few boxes to the right with a SPEAKING STONE glistening on top of them.

Go up to this SPEAKING STONE and activate it. This will activate a lengthy dialogue that is initiated by Vercanna, so while this is going on, explore around the map, kill some zombies, earn points, loot some chests and crystals if any are floating about etc until they finish chatting.


When they have finished chatting, a BLUE PORTAL will appear in the TENTS area that you need to go into, just behind where the SPEAKING STONE was located. Go up to it and hold the use button to enter it and lets see where it takes us.


Vercanna....baby! You don't write, you don't call....what's up with that?

When you emerge from the portal, you are now beginnging to complete the first part of the Easter Egg as you will now be on Vercanna's Home Soil area. Basically....its another objective linked to a portal....the same as the other portals on the map....except in a different area. 


All you need to do is complete the PURGE objective here and then you will be returned to the TEMPLE area again...shock horror I know, no surprises happening there then. 

When you come back from Vercanna's Home Soil, you can now head over to where the DECIMATOR SHIELD is and it will trigger a dialogue with KRAFFT. He will mention that the CRYSTAL LOCKS have been cracked.....I know it sounds like he's been drinking something funny.....but he is actually referring to 4 YELLOW CRYSTALS that are dotted around the map and are linked to unlocking the DECIMATOR SHIELD.

If you do not hear this quote, simply do another objective or two and come back, then it should prompt the quote to play in the next round.

Previously if you shot the crystals when you spotted them, without doing this step of the speaking stone, the crystal shows a 0 hit point every time you hit it. This means that they are indestructible. 

However, now you have disrupted the Augmentor's empowering them, they are now vulnerable to that old favourite metal....lead.....and a hail of bullets thrown at it.


You calling me Yella Mr Crystal?

Lets find out the locations of these 4 yellow crystals that belong to the DECIMATOR SHIELD. Most can actually be seen as soon as you look at the shield and do a 180 back towards the temple. You will see 3 of them....but lets be more specific shall we?


  • 2 yellow crystals are located in the TEMPLE area:


  • 1 yellow crystal is located on the side of the BAZAR in the WEST SPRING area:


  • 1 Crystal is on the side of the RADIO OUTPOST building, on the upper floor, in the EAST SPRING area:


When you destroy these crystals, yellow energy will flow from them towards the zombie shield, which takes a few seconds to get there so be patient, we know you can't wait to hear some zombie heads smashing off that shield when you get your hands on it, but good things come to those who wait.


Once the energy has been absorbed into the shield, you will be prompted to go and access another rune on the GROUND FLOOR of the BAZAAR building. 

Refer to the map for the WEST SPRING area in the part mentioning where the 4 yellow crystals appear and you can see the SPEAKING STONE LOCATION....this helps save on the bandwidth of 2 images the same, being posted in the same post.....see am too good to you.....especially if were on a mobile using mobile data and using this blog.....think how many MB I have now saved you :).


Once you activate it, Vercanna will initiate some dialogue which will last another few minutes, trying to set the scene and develop the zombies storyline a bit....hopefully enough to keep you interested.....as you may have went and had a coffee break at this point.....takes a little while to finish the dialogue.....deep breath's it will all be over soon I promise.


This will then spawn a nice looking GREEN PORTAL which will take you to another Easter Egg objective that will let you finally, unlock the DECIMATOR SHIELD. Head into the green portal and we will be on the next stage of the Easter Egg woo hoo!


Zaballa, don't tell me your green with envy?

Going through the green portal, we are met with a sort of boss fight in the form of Zaballa the Deceiver, who is not too happy to see us....probably because I didn't use the door bell on the portal and just burst through into her dimension without texting first.


You will see in this portal we have come through that the DECIMATOR SHIELD is floating up in the air in the centre of this area. After some dialogue from Zaballa we get into the thick of it and have to defence multiple SYPHONCORES from the sacrificial zombies that want to give their souls to this horrid statue.

You will notice that the SYPHONCORES have a red beam of energy linking to the DECIMATOR SHIELD in the centre. As each SYPHONECORE is protected from the zombies highlighted in red, which takes a good bit of time to get through, it breaks the link of red energy to the shield.

Zaballa the whole time, along with her zombie minions, will also be attacking you while trying to defend the cores. Taking her out first and foremost does make things a lot easier as this goes on for a bit of time this objective.


Once all SYPHONCORES have been defended and the objective has been completed, you will be returned to the TEMPLE area again, where you can now go over to the MERCHANT ROAD and claim the prize from the fair ground you have been after all day long, the DECIMATOR SHIELD!

This shield will keep an eye.....or two on you....on the battlefield. It has 2 different attacks,1 is the standard melee attack and the other is a DECIMATION BLAST attack....which is used later to free the BOOK OF TOME PAGES to unlock the room protected by a spell near the MERCHANT ROAD EAST area, but also fires out a blast of energy that kills zombies with ease.

Each time you use the DECIMATION BLAST, there is a 90 second cool down period before it can become active again, so you can't keep it going off like a machine gun.

This shield will take up a whole weapons on your loadout, so if you have 2 pack a punched guns, make sure you don't give up the one you want most or has been Pack A Punched to a higher level than another one. Give the worst weapon in place of the shield.

Lets take a tea break before moving onto the next step in the Easter Egg.


Not sure how to do it? Then check out MrRoflWaffles video here:


Thanks for reading as always guys.

Henry